Adding a New Multi-Factor Authentication (MFA) Method for Microsoft 365
Multi-Factor Authentication (MFA) is a crucial security feature that adds an extra layer of protection to your Microsoft 365 account. By requiring more than one method of authentication, MFA helps to ensure that your data and account are secure even if your password is compromised. This article will guide you through the steps to add a new MFA method for your Microsoft 365 account.
Prerequisites:
Before you begin, ensure you have:
- Administrative access to the Microsoft 365 Admin Center.
- A working phone (mobile or landline) or an app that supports MFA (like Microsoft Authenticator, Google Authenticator, etc.).
- A valid Microsoft 365 subscription.
Step-by-Step Guide:
Admin side:
Step 1: Sign in to the Microsoft 365 Admin Center
1. Open your web browser and go to the [Microsoft 365 Admin Center](https://admin.microsoft.com/AdminPortal/Home?#/homepage).
2. Sign in with your administrator credentials.
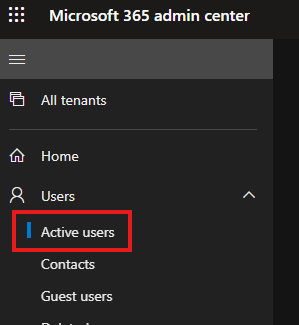
Step 2: Navigate to the Active Users Page
1. In the left-hand navigation pane, click on Users.
2. Select Active users from the dropdown menu.
Step 3: Select the User
1. From the list of active users, click on the name of the user for whom you want to add an MFA method.
2. This will open the user’s properties page.
Step 4: Manage Multi-Factor Authentication
1. On the user’s properties page, click on the Manage multi-factor authentication link located under the Security & privacy section.
2. This will open the Multi-Factor Authentication page.
Step 5: Enable MFA for the User (if not already enabled)
1. Find the user in the list and check the box next to their name.
2. Click on the Enable link to enable MFA for the selected user.
3. Confirm the action when prompted.
Step 6: Configure MFA Settings for the User
1. After enabling MFA, click on the Service settings tab.
2. Here, you can customize the settings, such as allowing users to create app passwords or remember multi-factor authentication for devices they trust.
User side:
Step 1: User Setup for MFA
1. Instruct the user to sign in to their Microsoft 365 account.
2. After entering their password, they will be prompted to set up additional security verification.
3. They will have several options for their second factor of authentication:
- Authentication Phone: A phone number where they can receive a call or text message.
- Office Phone: A landline number (if applicable).
- Mobile App: Using the Microsoft Authenticator app or any other authenticator app.
Step 2: Add a New MFA Method
1. Instruct the user to select their preferred method for MFA setup.
- For Mobile App:
- Download and install the Microsoft Authenticator app from the app store.
- Open the app and select Add account.
- Choose Work or school account.
- Use the app to scan the QR code displayed on the Microsoft 365 setup page.
- For Phone:
- Enter the phone number and select whether to receive a call or a text message.
Step 3: Verify and Finish Setup
1. The user will receive a verification code or call, depending on the method chosen.
2. Enter the verification code or answer the call to complete the setup process.
Step 4: Confirm Setup
1. Once the verification is successful, the additional MFA method will be added to the user's account.
2. The user can now use this new method for future sign-ins to enhance the security of their Microsoft 365 account.
If you want to add a new authentication method for your account, you can do so on the Security Information page.
You can follow this link to open the Additional security verification page.
Or you can get to the Additional security verification page by following these steps:
- Sign into the Microsoft 365 portal (office.com).
- Select your avatar in the top right, then select View account.
- Under Security info select Update info.
- Click +Add sign-in method
- Select the method you need and follow the instructions provided
Note: For information about using the App passwords section of the Additional security verification page, see Manage app passwords for two-factor verification. App passwords should be used only for apps that don't support two-factor verification.
Conclusion:
By following these steps, you can successfully add a new MFA method to a user’s Microsoft 365 account, thereby increasing the security of your organization’s data. Regularly review and update MFA settings to ensure that your organization’s accounts remain secure against unauthorized access.
Related Articles
Migrating your MFA (Multi-Factor Authentication) and SSPR (Self-Service Password Reset)
Migrating your MFA (Multi-Factor Authentication) and SSPR (Self-Service Password Reset) policy settings to the Authentication methods policy in Microsoft Entra ID is a crucial step to streamline and enhance your security management. Here's a detailed ...How to create a new Outlook Profile
Exit Outlook. In Control Panel, click or double-click Mail. Where is Mail in Control Panel? Mail appears in different Control Panel locations depending on the version of the Microsoft Windows operating system, Control Panel view selected, and whether ...Recommended steps to take if an account is compromised
Recommended steps to take if an account is compromised: Reset the user's password immediately. Do not communicate the new password through email to the end user. Enable Multi-Factor Authentication (MFA) to prevent compromised accounts, especially for ...Azure and Microsoft 365 Services Disclaimer
Services provided by IT Partner are designed to help our customers use Microsoft Azure and Microsoft 365 Cloud platforms. While we strive to provide the highest level of service and support, please be aware of the following: 1. Service Availability: ...How to export all users of dynamic distribution list in Microsoft 365
Dynamic Distribution Lists (DDL) in Microsoft 365 are groups that automatically include users based on filters and conditions. However, you cannot directly export members of a DDL as you would with a regular distribution list. Instead, you can use ...